AWS OpsWorks for Chef Will be Discontinued in All AWS Regions on May 26, 2024.
Progress Chef SaaS is a purpose-built offering to manage your infrastructure for OpsWorks customers with an easy three-step migration process.
Find More Information HereAWS OpsWorks is an application management service that makes it easy to deploy and operate applications of all shapes and sizes. OpsWorks supports Chef recipes for automating these services.
With the release of OpsWorks Chef 12 for Linux, namespace conflicts have been resolved between OpsWorks cookbooks and Chef community cookbooks allowing people to use community cookbooks in their OpsWorks infrastructure. Chef is working closely with OpsWorks to integrate both products and remove the friction between workflows with either product. Opsworks Chef 12 for Linux takes us one step closer by enabling the use of any community cookbooks.
This post will walk through the process of using OpsWorks and Chef to create a simple web application using Django. We’ll use community cookbooks and dpaste, an open source project that stores text snippets using Django, a free and open source web application framework written in Python.
This isn’t an in-depth guide for Python, Django, Chef, or OpsWorks; while I’ll point out some key components to think about with a working example, prior to deploying to your environment you should ensure that you think through your specific concerns. I look forward to hearing your feedback and any modifications that you test out.
Background
Before we get too much further, let’s establish a common understanding so that we can bridge the cultures between these different technologies, Chef and OpsWorks.
Chef Basics
Within Chef, we have the concepts of resources, recipes, and cookbooks.
Resources are the basic building blocks of our infrastructure. We can use resources as provided by core chef, pull resources in from community cookbooks, or we can extend and customize our own resources.
Recipes are the description of a specific piece of an application that we want to have running on a system. It’s the ordered set of resources and potentially additional code for logic and flow control. Just as with a recipe for baking chocolate chip cookies or oatmeal cookies, the recipe will be specific to what we want to create.
Cookbooks are a collection of recipes and other supporting files. One of the supporting files is
the metadata.rb file that specifies the cookbook’s version number. We can create our own cookbooks or pull from the community cookbook repository, the Supermarket.
One great thing about chef community cookbooks is that you can reuse what makes sense for you, and create more specific cookbooks and recipes within your environment.
OpsWorks Basics
There are 5 key OpsWorks abstractions: apps, instances, layers, lifecycle events, and stacks.
An app represents code that you want to run on an application server. Code is stored in source control, as a bundle on AWS S3, or as an http archive.
An instance represents a computing resource, such as an Amazon EC2 instance.
A layer is a blueprint that describes a set of one or more instances. The layer defines the packages that are installed and other configurations. Instances can belong to multiple layers, as long as the layers don’t have overlapping configurations.
A stack is the top-level OpsWorks entity. Each stack will contain one or more layers which each contain instances. As a whole, the stack represents a set of instances that you want to manage collectively. An example of a web application stack might look something like:
- A set of application server instances.
- A load balancer instance which takes incoming traffic and distributes it across the application servers.
- A database instance, which serves as a back-end data store for the application servers.
A common practice is to have multiple stacks that represent different environments. A typical set of stacks might consist of a development, staging, and production stack.
A lifecycle event is one of a set of 5 events that can occur with an AWS OpsWorks layer: Setup, Configure, Deploy, Undeploy, and Shutdown. At each layer there will be a set of recipes associated and run when the lifecycle event is triggered.
Django Terminology
Within Django an app is a Web application that does something, for example a poll app. Within Django a project is a collection of apps and configurations. An app can be in multiple projects.
Django follows the MVC (Model View Controller) architectural pattern. In the MVC architectural pattern, the model handles all the data and business logic, the view presents data to the user in the supported format and layout, and the controller receives the requests (HTTP GET or POST for example), coordinates, and calls the appropriate resources to carry them out.
We want to deploy dpaste, an open source project that stores text snippets. It is a Django project so it requires Django to be installed on the system. Django is a free and open source web application framework written in Python.
Django Installation Requirements
There are core applications required to install Django: Python, a package management system like pip, and optionally virtualenv, a way to isolate your python environments. You have a number of choices that may change how you want to deploy within your environment, for example what version of Python you are using as a standard within your organization. Before you run something in production, you should always understand the implications of what you are doing, and why.
Understanding the requirements of our application helps us decide how we will approach automating the installation. It also helps us in understanding whether a community cookbook serves our needs, what customizations we might need, and the overall effort of those customizations.
Django Deployment Requirements
In order for Django to be useful, you also need a few additional applications: WSGI-compatible web server, and a database application.
The Web Server Gateway Interface (WSGI) is a specification for a simple and universal interface between a web server and web application for Python. The goal is that any application written to the specification will run on any server that also complies with the specification.
A WSGI-compatible web server will receive client requests and pass them to the underlying WSGI-compatible web application. It will also receive responses from the web application and return them to the client.
Note: In this how-to post, we are deploying a Django app, dpaste from code straight off of github https://github.com/bartTC/dpaste. In general you shouldn’t do this, as you should validate the software that you are installing does what you want it to do. For the purpose of understanding the concepts in this post, it works.
dpaste is a Django based pastebin. From the installation instructions, we know that we need to do the following things to get dpaste running:
- Download the
dpastecode. - Create a virtualenv.
- Install the required python packages into the environment.
- Sync the models to the database.
- Propagate models to the database schema.
- Start up a web server.
In this how-to, we will use gunicorn, a lightweight Python WSGI HTTP server.
Introducing the Chef Community Supermarket
The Chef Supermarket is the location to find cookbooks shared by and with the community. Some of these cookbooks are maintained by my team, the Chef Community Engineering team, others are maintained by individuals in the community.
We could create a python application cookbook that would pull the application code, create the virtualenv, install the python package and all dependencies, deploy and configure our database, and start up a web server, or we could use a cookbook that is available in the community. For the purpose of this how-to, Noah Kantrowitz’s application_python cookbook to deploy and manage our Django app will work.
The Supermarket interface gives us quite a bit of information about this cookbook. It shows the README which has information about quickly getting started, requirements, and dependencies. We can go directly to the source code, or download the cookbook directly from the Supermarket.
A key requirement to note is that Chef 12 or later is required. Make sure that if you modify the instructions in this how-to that at minimum you use Chef 12 if using this cookbook.
Download the sample wrapper Cookbook from the Supermarket
For the purposes of this part of the walkthrough, we assume that you have the following setup on your working environment:
We’ve gone ahead and created a sample cookbook that will use the application_python cookbook.
Inside of our metadata.rb file we include the required dependencies on the community cookbooks `application_python`, `build-essential`, and `poise-python`.
Download and extract the Opsworks Linux Demo Django cookbook that contains our example code. For example, using git you can clone the demo cookbook.
git clone git@github.com:chef-cookbooks/opsworks-linux-demo-cookbook-django.git
Examining our recipe
The first item in our recipe is to include the default recipe from the build-essential cookbook. This recipe ensures the packages required for compiling C software from source.
include_recipe 'build-essential'
We setup a variable that will allow us to setup an app_path based on the OpsWorks app shortname.
app = search(:aws_opsworks_app).first
app_path = "/srv/#{app['shortname']}"
Based on the requirements.txt we need to install mysql-python, so we need to install the development package for mysql. The name of this package depends on the platform, so we set this up in the attributes file.
package node['django-demo']['mysql_package_name']
Within our default recipe, we are using the package resource to install git on our node.
package 'git' do
  options '--force-yes' if node['platform'] == 'ubuntu' && node['platform_version'] == '14.04'
end
Next, we are using the application resource.
application app_path do
 ...
end
app_path is a ruby variable that we have defined at the top of our recipe based off of the AWS OpsWorks App name that we created earlier.
app = search(:aws_opsworks_app).first
app_path = "/srv/#{app['shortname']}"
Within the application resource we are defining a git parameter.
git app_path do
  repository app['app_source']['url']
  action :sync
end
This git parameter is based off of the value that we set for the AWS OpsWorks App Application Source Repository URL value earlier, i.e. https://github.com/bartTC/dpaste.git.
Next, within the application resource, we are defining additional parameters. If you were writing a wrapper around the application_python cookbook, this is one place you would customize based on your requirements. For this guide, we are using the latest python 2 and configuring a virtualenv for our environment based off of the application name, dpaste.
  python '2'
  virtualenv
Next, within the application resource, we have the parameter pip_requirements. This parameter makes sure that pip install -r requirements.txt is run. This is a python standard to install python packages within the virtualenv based off of a requirements.txt file.2
For our application, this requirements.txt file is coming from our source code: https://github.com/bartTC/dpaste/blob/master/requirements.txt.
pip_requirements
Next, we add additional configuration information to the dpaste/settings/deploy.py file.
file ::File.join(app_path, 'dpaste', 'settings', 'deploy.py') do
  content "from dpaste.settings.base import *\nfrom dpaste.settings.local_settings import *\n"
end
Next within the application resource, we specify the django parameter. This is a very detailed parameter with a lot going on. Within this block we:
- configure Django to be installed,
- allow connections to the application,
- add the Dpaste application,
- configure the Django Object Relational Mapping(ORM) to use a local SQLite database,
- sync our models to our database, and
- propagate changes to models to our database schema.
django do
  allowed_hosts ['localhost', node['ipaddress'], node['fqdn']]
  settings_module 'dpaste.settings.deploy'
  database 'sqlite:///dpaste.db'
  syncdb true
  migrate true
end
Finally, within our application resource, we set up the required WSGI-compatible web server, gunicorn, a lightweight Python WSGI HTTP server.
gunicorn
Without any additional configuration, we are accepting the default, which will have gunicorn running on port 80.
Prerequisites and Assumptions
For the purposes of this walkthrough, we assume that you have the following setup:
- Signed up for an AWS account
- IAM User credentials
- Service Access Permissions enabled on your IAM user
- AWS Command Line Tool (AWS CLI) installed on your workstation.
bashor equivalent shell
Local AWS Configuration
When using the AWS CLI, it’s helpful to have a local AWS configuration. If you don’t already have an AWS configuration, go ahead and create one to simplify your AWS CLI commands.
Add the following to ~/.aws/config, making sure to paste in your aws_access_key_id and aws_secret_access_key values. Don’t leave these blank! :
[default]
region = us-east-1
aws_access_key_id = PUT_YOUR_KEY_ID_HERE
aws_secret_access_key = PUT_YOUR_SECRET_ACCESS_KEY_HERE
Bundling up the Cookbook for OpsWorks
Identify your artifact store. OpsWorks can work with either HTTP or S3.
Using S3 is pretty simple. Create the bucket where you will store the cookbooks. Assign the correct permissions so that you can access this bucket.
Once it’s created you can then use the AWS S3 CLI to copy the cookbook up to S3.
- Within the
opsworks-linux-demo-cookbook-djangodirectory runberks package.3 This creates a single archive containing all of the required cookbooks. - Use the AWS S3 CLI to copy up the resulting cookbooks artifact to your bucket.
aws s3 cp COOKBOOKS_ARTIFACT.tar.gz s3://YOURBUCKET/opsworks-linux-demo-cookbook-django.tar.gz
- Verify the upload with the AWS S3 CLI.
aws s3 ls s3://YOURBUCKET
Introducing the Django App Server layer
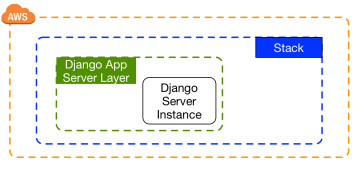
The Django App Server layer is an AWS OpsWorks layer that will provide a blueprint for instances that function as Django application servers.
If you run into problems, check the AWS OpsWorks Debugging and Troubleshooting Guide.
Creating the Django App Server layer
Note: Make sure that you do not use the app name of test or django as these names will cause conflicts with Python or Django.
Note: When you choose a location for your Django source, don’t drop it in your web server’s document root. Django is separate from your web server and you don’t want to expose the underlying code.
Now that we’ve set the context of what we are doing, let’s take a look at this sample cookbook and walkthrough the process of using it.
Create your First Stack
Note: The AWS OpsWorks CLI endpoint is only available in region us-east-1. This region specification is separate from the stack’s region configuration.
Note: The OpsWorks CLI configuration variable for the Chef version is ConfigurationManager. Make sure that you are specifying at minimum Chef Version 12.
Amazon Resource Names(ARNs) uniquely identify resources on AWS. To work with AWS OpsWorks, we need to obtain theServiceRoleArn. To do this, we will first need to create a stack, and then get the ServiceRoleArn.
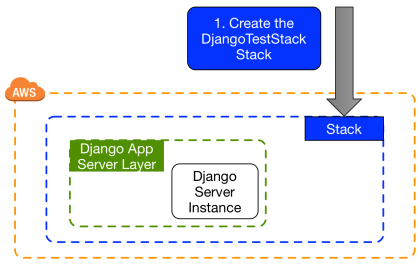
The stack is the top-level OpsWorks entity that will contain our layers, in this case specifically the Django App Server layer.
- Using your IAM user, sign in to the OpsWorks console at https://console.aws.amazon.com/opsworks.
- Do one of the following:
- If the Welcome to AWS OpsWorks page displays, choose Add your first stack. The Add stack page displays.
- If the OpsWorks Dashboard page displays, choose Add stack. The Add stack page displays.
- If the Add stack page displays, don’t do anything else yet.
- Select the Chef 12 stack.
- Fill in the form as follows:
- Stack name DjangoTestStack
- Region US West (Oregon)
- Default operating system Amazon Linux 2015.09
- Click on custom Chef cookbooks Yes.
- Fill in the custom Chef cookbooks form with the following information:
- Repository type
- Repository URL (the COOKBOOKS_ARTIFACT.tar.gz file uploaded to S3)
- Click on Advanced to get further options.
- Fill in the Advanced form as follows.
- OpsWorks Agent version “Use latest version”
- Click on Add Stack.
The following commands assume an AWS configuration that has been set with the region information as us-east-1. If you can’t set this in your configuration you will need to add a flag --region us-east-1 to each of these commands.
Verify that you can see your newly created stack by using the AWS CLI.
aws opsworks describe-stacks
Set up an environmental variable of SERVICE_ROLE_ARN:
SERVICE_ROLE_ARN=$(aws opsworks describe-stacks --query 'Stacks[*].ServiceRoleArn' --output text |awk '{ print $1 }')
In this command, we are using the AWS OpsWorks CLI describe-stacks command to pull information about the stacks, pulling out just the ServiceRoleArn in order to use it later.
Set up an environmental variable of DEFAULT_INSTANCE_PROFILEs_ARN:
DEFAULT_INSTANCE_PROFILEs_ARN=$(aws opsworks describe-stacks --query 'Stacks[*].DefaultInstanceProfileArn' --output text |awk '{ print $1 }')
In this command, we are using the AWS OpsWorks CLI describe-stacks command to pull information about the stacks, pulling out just DefaultInstanceProfileArn.
Obtain the StackId of the stack we just created. If you are already using AWS OpsWorks and have existing stacks, you’ll need to determine this and set STACK_ID appropriately.
STACK_ID=$(aws opsworks describe-stacks --query 'Stacks[*].StackId' --output text)
We have created an AWS OpsWorks stack called DjangoTestStack that will contain the layers that we will create next. As a whole, this stack will represent the set of instances that we want to manage collectively.
Create your First Layer
Next we will create our first layer. Remember that an AWS OpsWorks layer is a blueprint that describes a set of one or more instances. The shortname is required to only contain lower case a-z, 0-9, and – or _ characters.
In our layer we will be associating the default recipe from our opsworks-linux-demo-cookbook-django cookbook to the Deploy lifecycle event.
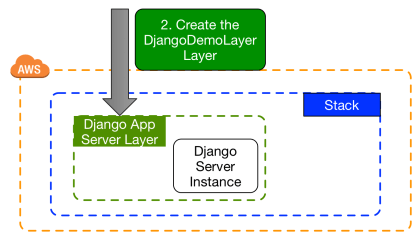
LAYER_ID=$(aws opsworks create-layer --stack-id $STACK_ID --type custom --name DjangoDemoLayer --shortname djangodemolayer --custom-recipes '{
                "Undeploy": [],
                "Setup": [],
                "Configure": [],
                "Shutdown": [],
                "Deploy": [
                  "opsworks-linux-demo-cookbook-django"
                ]
            }' --output text)
Examine the layer you just created.
aws opsworks describe-layers --layer-ids $LAYER_ID
Add an App
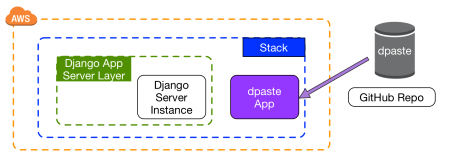
APP_ID=$(aws opsworks create-app --stack-id $STACK_ID --name dpaste --app-source '{
            "Url": "https://github.com/bartTC/dpaste.git",
            "Type": "git"
        }' --type other --output text)
Add an Instance to your Layer
Add a t2.micro instance to our Layer.
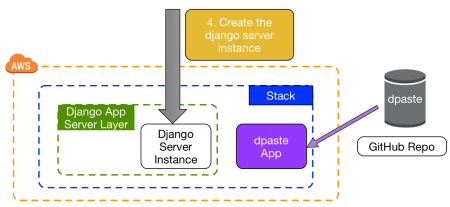
INSTANCE_ID=$(aws opsworks create-instance --stack-id $STACK_ID --layer-id $LAYER_ID --instance-type t2.micro --output text)
Start our instance.
aws opsworks start-instance --instance-id $INSTANCE_ID
Examine our instance.
aws opsworks describe-instances --instance-ids $INSTANCE_ID
It will take a few minutes for the instance to finish spinning up, so be patient. Status will progress from stopped torequested, to pending, to booting, to running_setup, and then finally to online.
After Status changes to online, setting up changes from 1 to 0, online changes from 0 to 1.
Obtain the IP Address of the instance that was just created.
IPADDRESS=$(aws opsworks describe-instances --instance-ids $INSTANCE_ID --query 'Instances[*].PublicIp' --output text)
From the OpsWorks Dashboard, identify and confirm that you have a user that has access to ssh into the stack. Click on My Settings. You’ll see a line like below that shows you how to connect to your instance.
ssh -i ~/.ssh/[your-keyfile] USER@INSTANCE-DNS
Verify that in the Permissions section below that your user has the access to ssh to your DjangoTestStack stack. You should see a green checkmark in the SSH column for your stack.

Ssh into your instance, and verify that your host has deployed the app.
ssh -i ~/.ssh/[your-keyfile] USER@IPADDRESS
curl localhost
The default security group used with OpsWorks is AWS-OpsWorks-Default-Server. It only allows access to the server on port 22 via ssh. If you want to verify from your browser, create a security group that allows ingress access to the server on port 80.
Now that you have created a functioning stack, layer, and instance, you can create additional stacks using the AWS CLI. You just need the ServiceRoleArn and the DefaultInstanceProfileArn which we obtained earlier in this how-to post.
The command looks like this:
STACK_ID=$(aws opsworks create-stack --name STACK_NAME --service-role-arn $SERVICE_ROLE_ARN --default-instance-profile-arn $DEFAULT
Cleanup
You can clean up via the AWS console, or from the command line. The following instructions are using the command line.
Stop the instance.
aws opsworks stop-instance --instance-id $INSTANCE_ID
Stop the stack.
aws opsworks stop-stack --stack-id $STACK_ID
Delete the app.
aws opsworks delete-app --app-id $APP_ID
Delete the instance.
aws opsworks delete-instance --instance-id $INSTANCE_ID
Delete the layer.
aws opsworks delete-layer --layer-id $LAYER_ID
Delete the stack.
aws opsworks delete-stack --stack-id $STACK_ID
If you set up a security group and are no longer using it, don’t forget to remove it. If you know the group id, you can remove the security group from the command line.
aws ec2 delete-security-group --group-id $GROUP_ID
Summary
In this walk-through we used OpsWorks, Chef, and community cookbooks to create a simple web application using Django.

