IT Service Management (ITSM) has always been about increasing the value of the customer service chain. Over the years, automation has been a key driver of efficiency among IT administrators to deliver uninterrupted IT services. Chef Automate has been at the core of this automation, helping administrators create and update CMDBs with information from the numerous nodes in the IT fleet. In this blog, you’ll discuss the integration between Chef Automate and one of the most popular ITSM tools, ServiceNow.
Chef Automate aggregates information about infrastructure nodes, Chef Infra Client runs, and Chef Compliance scans, helping you monitor your infrastructure in real-time. The integration works by exposing the REST API endpoints for communication between Chef Automate and ServiceNow.
What you will see
In this post, you will see how Chef Automate and ServiceNow work together by using the example of a sample Chef cookbook including tasks such as:
- Installing Samba Package
- Enabling Samba Service and ensuring it is in running state
- Creating an InSpec profile that validates whether Samba is Installed and Running
- Observing notifications in ServiceNow.
What you will need
- Chef Automate Instance
- Access to ServiceNow instance
- Target Node- connected as well as bootstrapped. These nodes should be visible in Chef Automate
- Data Feeds and notifications in Chef Automate instance
Data Feeds and Notifications
Creating Data Feeds in Chef Automate
Data Feeds from Chef Automate include system details (e.g., Hostname, CPU, Memory etc.), installed software, Chef Infra Cookbooks/Runs, and Chef InSpec Profiles/Audits.
Steps to setup Data Feeds in Chef Automate:
- From the Chef Automate UI, click on Settings
- Click on the Data Feeds button on the left side of the page
- Click on New Integration
- Click on Service Now Integration
- Enter the following Details:
- Name: A unique name for this integration
- Data Feed URL: The API address that the notification uses. It has the format: https://ven12345.service-now.com/api/x_chef_automate/asset
- Username: The name used to sign in to ServiceNow
- Password: The password used to sign in to ServiceNow
- Select Test Connection. A successful test displays ServiceNow Automate connectivity result as passed. An unsuccessful test returns a message with information about the error.
- Click Save to save the setup.
Creating Notifications in Chef Automate
Integrating notifications helps you capture the failures in automated infrastructure and compliance checks and therefore improve your incident tracking and resolution processes.
Steps to set up notifications in Chef Automate.
- Click on Settings from the Chef Automate UI
- Click on Notifications> Create Notification
- Setup automatic incident creation for: Chef Infra Client failures, Chef InSpec scan failures
- Enter or select:
- Name: A unique name.
- Webhook Type: The product receiving the notification. Select ServiceNow
- Failure Type: The Chef process the notification. Select
Infra Client Run failures. - Webhook URL: It has the format:
https://ven12345.service-now.com/api/x_chef_automate/client_run. - ServiceNow Username: The name used to sign in to ServiceNow.
- ServiceNow Password: The password used to sign in to ServiceNow.
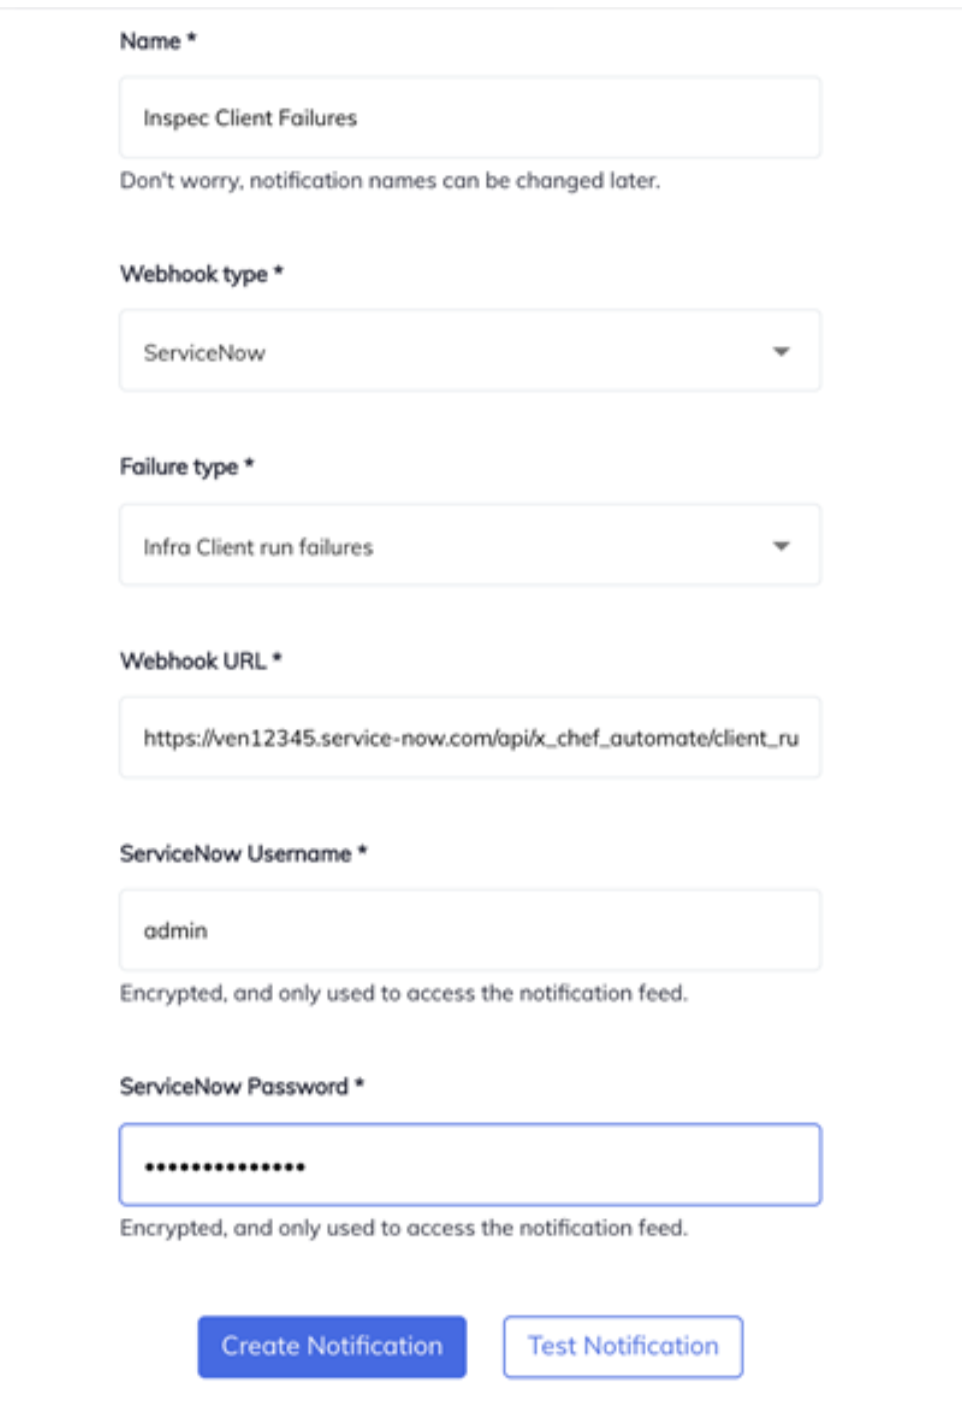
- Select Test Notification. Once the Notification is tested successfully, click on Create Notification.
Note- You can use the same steps to add InSpec Compliance Scan Failures. Format of the URL will be- https://ven12345.service-now.com/api/x_chef_automate/inspec_scan
Deploying and Using InSpec Tests with Service Now
Chef InSpec Profiles check the status of all your nodes to see if they are compliant with the pre-defined policies.
Creating a InSpec profile
Generate a new profile by using the Chef generator:
$ inspec init profile test-samba
This will create several folders and files including a controls/example.rb file with example content, and an inspec.yml file. Edit inspec.yml file and add the following-:
name: test-samba
title: Test Samba is installed and running
maintainer: Akshay copyright: Akshay
copyright_email: akshay@progress.com
license: Apache-2.0
summary: Check if Samba is installed and running
version: 0.1.0

 supports: platform: os
InSpec profiles contain controls which describe every test you can perform.
control 'samba-1.0' do
  impact 1.0
  Title 'Test Samba is Installed and Running'
  desc 'Ensure that the samba app is installed and running'
  describe package('samba') do
  it {should be_installed }
  end
  describe service('smbd') do
  it {should be_enabled }
  it {should be_running }
  end
end
In this file you have one control structure with three tests: one that checks if the samba package is installed and two others that verify that the smbd, samba daemon is enabled and running.
Verify the controls.
$ inspec exec test-samba
Login to Chef Automate via InSpec.
$ inspec compliance login --insecure https://ec2-65-2-108-xxx.com --user 'admin' --token '7435xxxxxxxxxxcuGkxxx'
Note- The token value is the API Token created in the Automate dashboard under Settings.
Upload the profile to Automate:
$ inspec compliance upload test-samba
Verify the profile is uploaded correctly
$ inspec compliance profiles
Now you can see the profile in Chef Automate UI. Now, let’s run this profile through Chef Automate on a node. For this, you need to have node credentials and an integrated node.
Node Credentials
- Open Chef Automate UI and go to Settings> Node Credentials
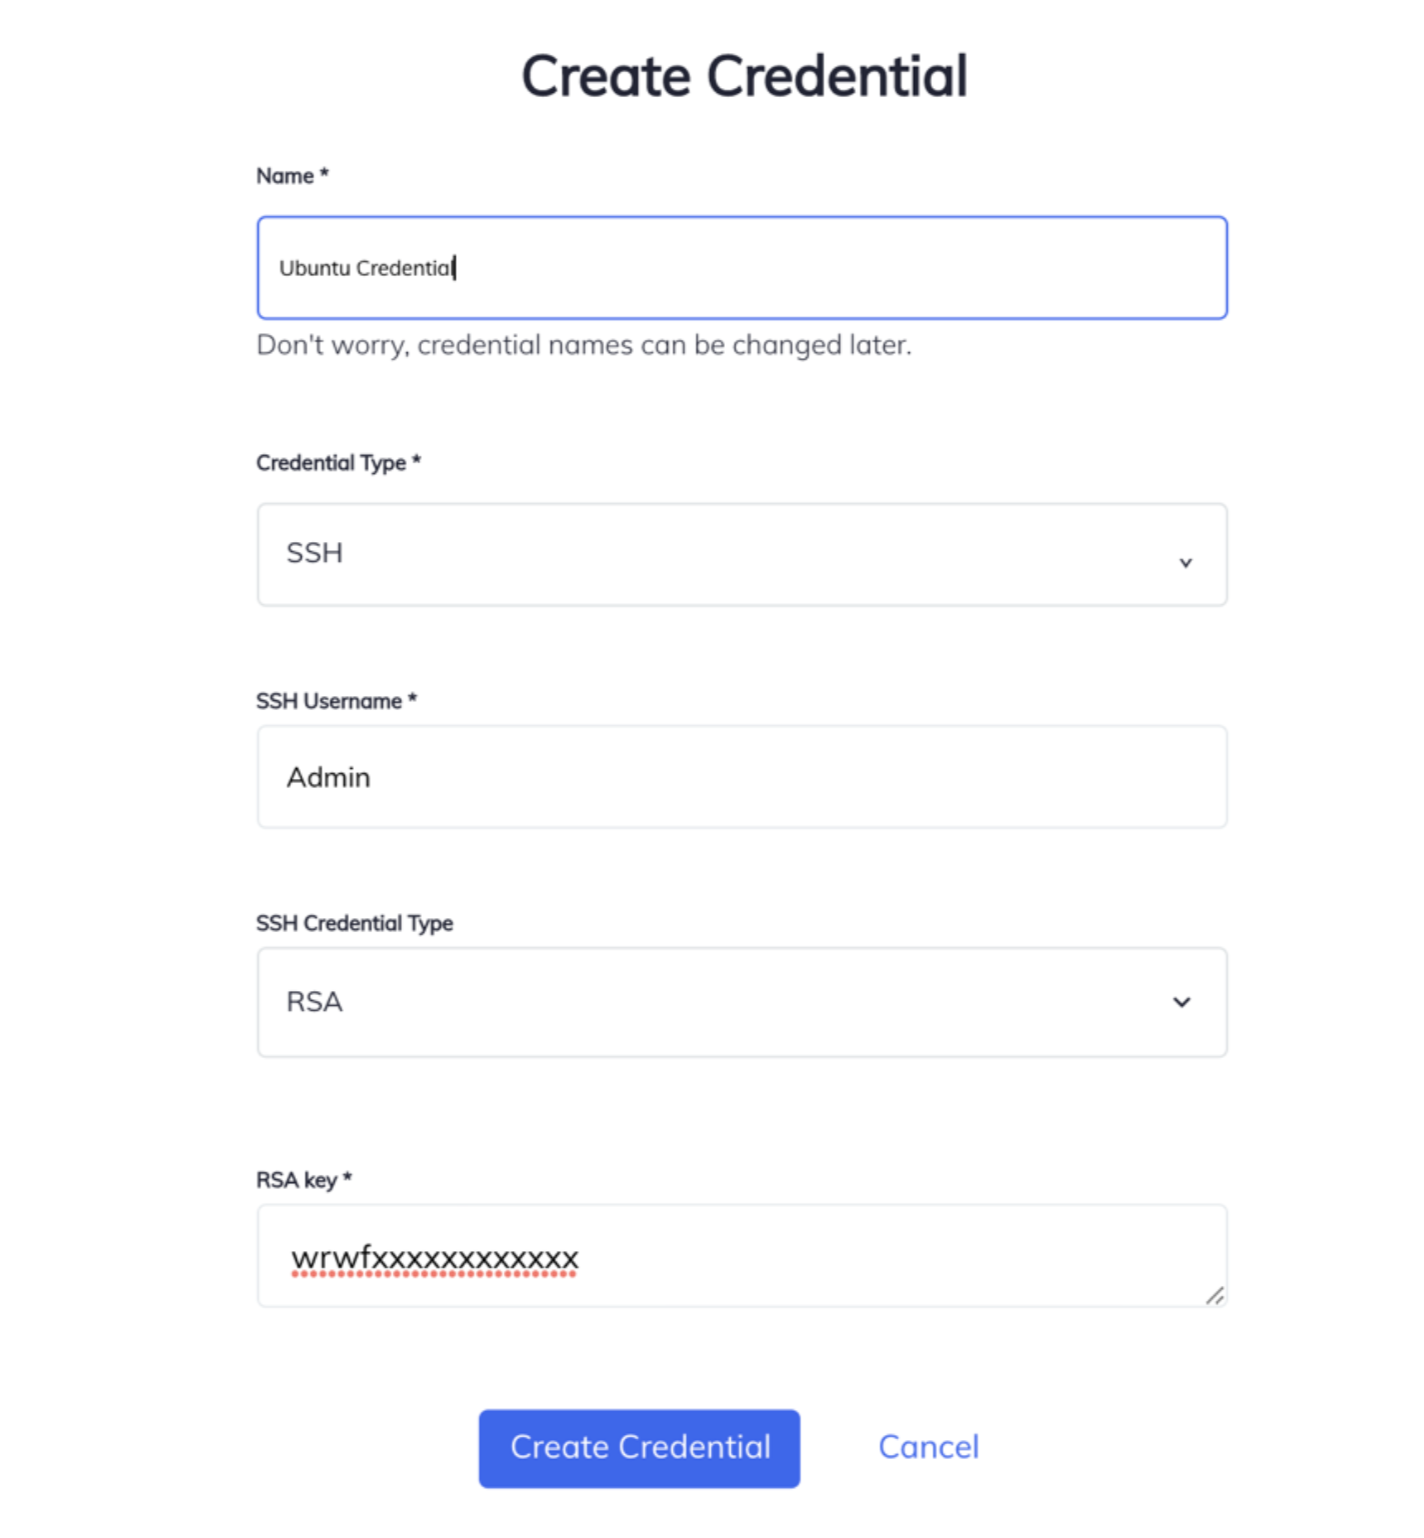
- Click on Create Credential and enter or select:
- Name: Unique Name
- Credential Type: Select from SSH, WinRM or Sudo. (SSH is selected for now) SSH Username: Enter Username SSH
- Credential Type: Select from RSA or Password (RSA is selected)
- RSA Keys: Enter RSA Key
- Click on Create Credentials.
Node Integrations
- Click on Settings> Node Integrations > Integrations> Automate
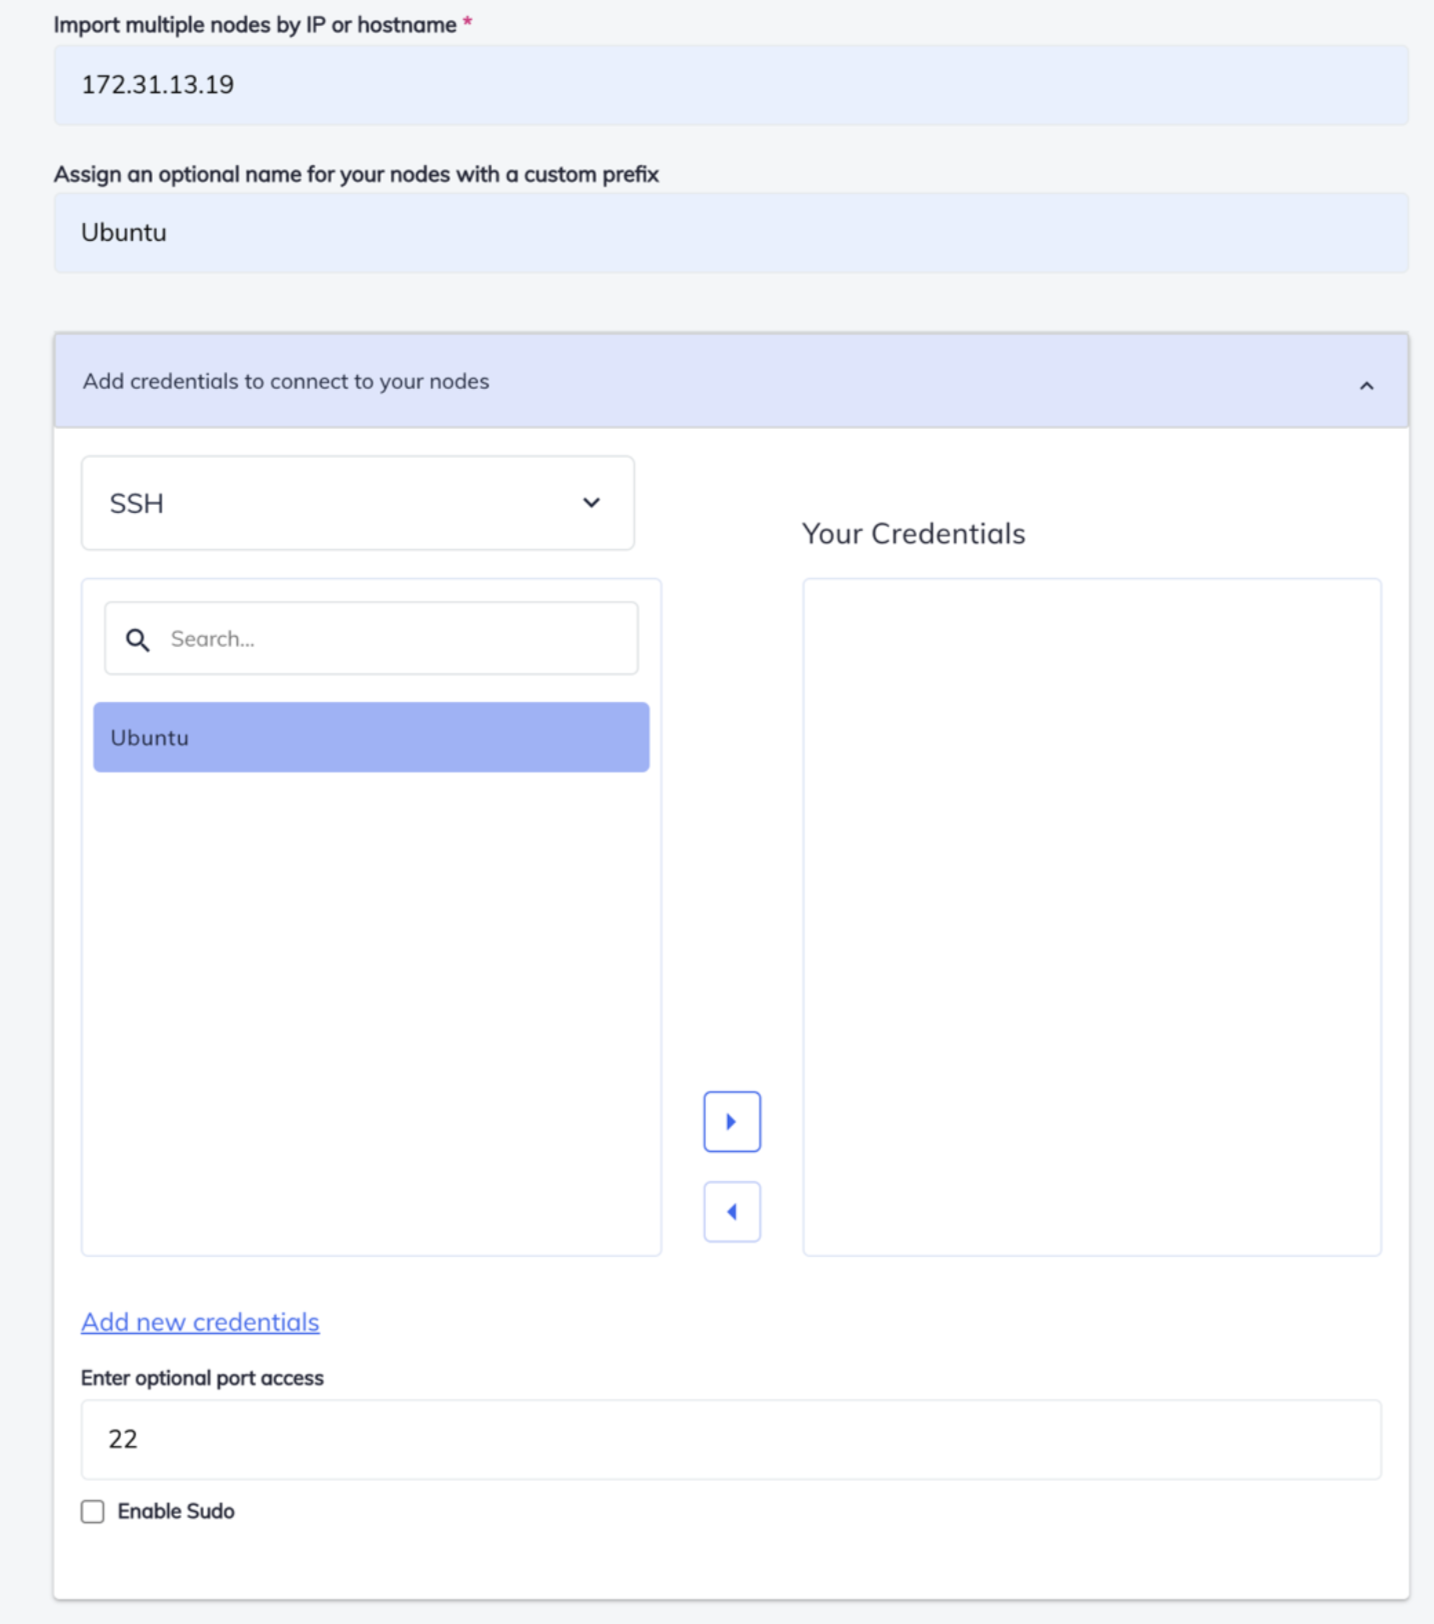
- Click on Add Nodes
- Add following detail-
- Ip or Hostname
- Optional Name for Nodes Add Credentials- Select from SSH or WinRM . Below one can see the node created in Node Credentials. Select it and click on [ >] Option. This will take pre-defined credentials.
- You can also add new Credentials by Clicking on Add new Credentials.
- After completing the detail click on Add Nodes
Now you need to create a Scan Job so that you can scan your profile on the node.
Creating Scan Job
- Click on the Compliance.
- Click on the Scan Jobs.
- Click Create New Job
- Select the node from list and Click on Next
- Select test-samba Profile and Click on Next
- Give a unique name for this Scan Job. Set schedule for the scan.
Note- If you want this scan to happen just once, you can avoid scheduling scans - Click on Save
Let’s check the result in our Service Now instance. The ServiceNow Automate integration is designed to get data from Chef Automate into ServiceNow. You should be able to see the following information:
Data seen in CMDB integration app
- Ohai Data around OS, hardware, installed software, and Filesystems
- Chef Infra data including Chef run results, Cookbooks, Recipes, Run Lists
- Chef InSpec compliance data including passing and failing scan results, Profiles & Controls.
Date seen in Incident application.
- Information about InSpec failures in case any.
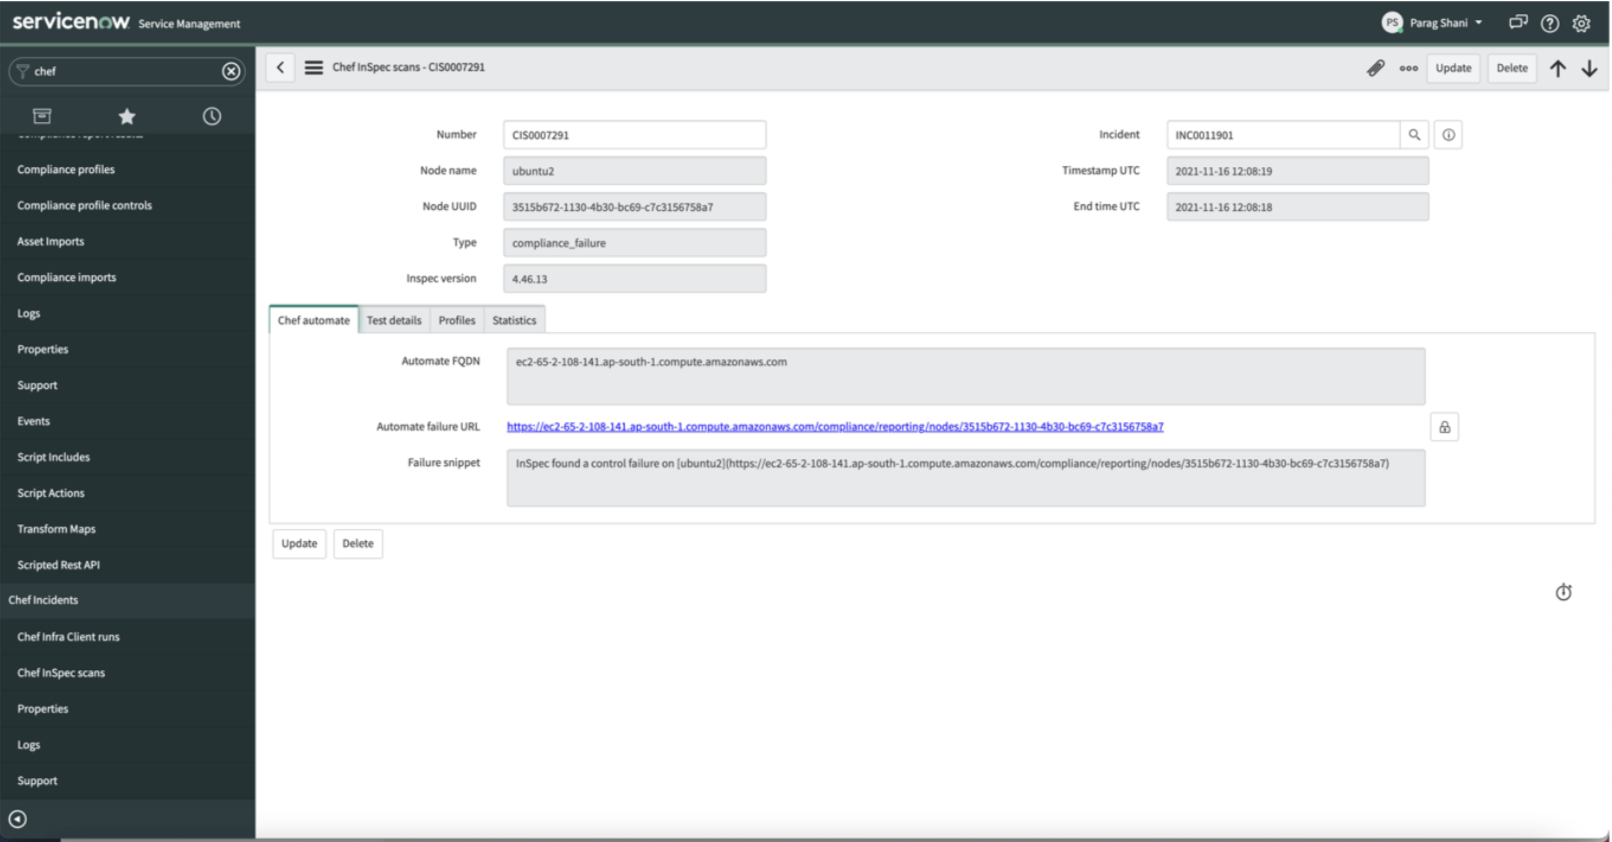
Clicking on the failure URL will take you to the Chef Automate Dashboard and you can see detailed information about the non-compliant node.
Deploying Cookbooks
Cookbooks consist of recipes, metadata, attributes, resources, templates, libraries, and anything else used to create a functioning system. Recipes contain information about everything needing to be run, changed, or created on a node. Recipes work as a collection of resources determining the configuration or policy of a node. For a node to run a recipe, it must be on that node’s run list.
# Cookbook:: Samba
# Recipe:: default
#
# Copyright:: 2021, Akshay, All Rights Reserved.
package 'samba' do
action: install
end
service 'smbd' do
 action [: enable,: restart]
end
Whenever a Cookbook is created without a specified Recipe, the default Recipe (default.rb) will be executed. This cookbook will install Samba Package and will enable Samba service. Let us try running this Cookbook on our node-
$ knife upload cookbook run-Samba-Server
$ knife node run_list add ubuntu1 'recipe[run-Samba-Server]'
The first command uploads your Cookbook to the Chef server. The second assigns your run-Samba-Server Cookbook to run on that node.
$ knife ssh 'name: ubuntu1' 'sudo chef-client'
This command enables us to run the command ‘sudo chef-client ’ on any remote node.
While running the Cookbook, you can see that it is installing the Samba Server.

When a client run fails the InSpec profile run is triggered through the Scan Jobs process, and a new ticket is created under Chef Infra Client Runs.
The ticket showing the Client Run includes a URL directing to the Chef Automate dashboard. You can also see the successful run result information in the Chef Automate dashboard.
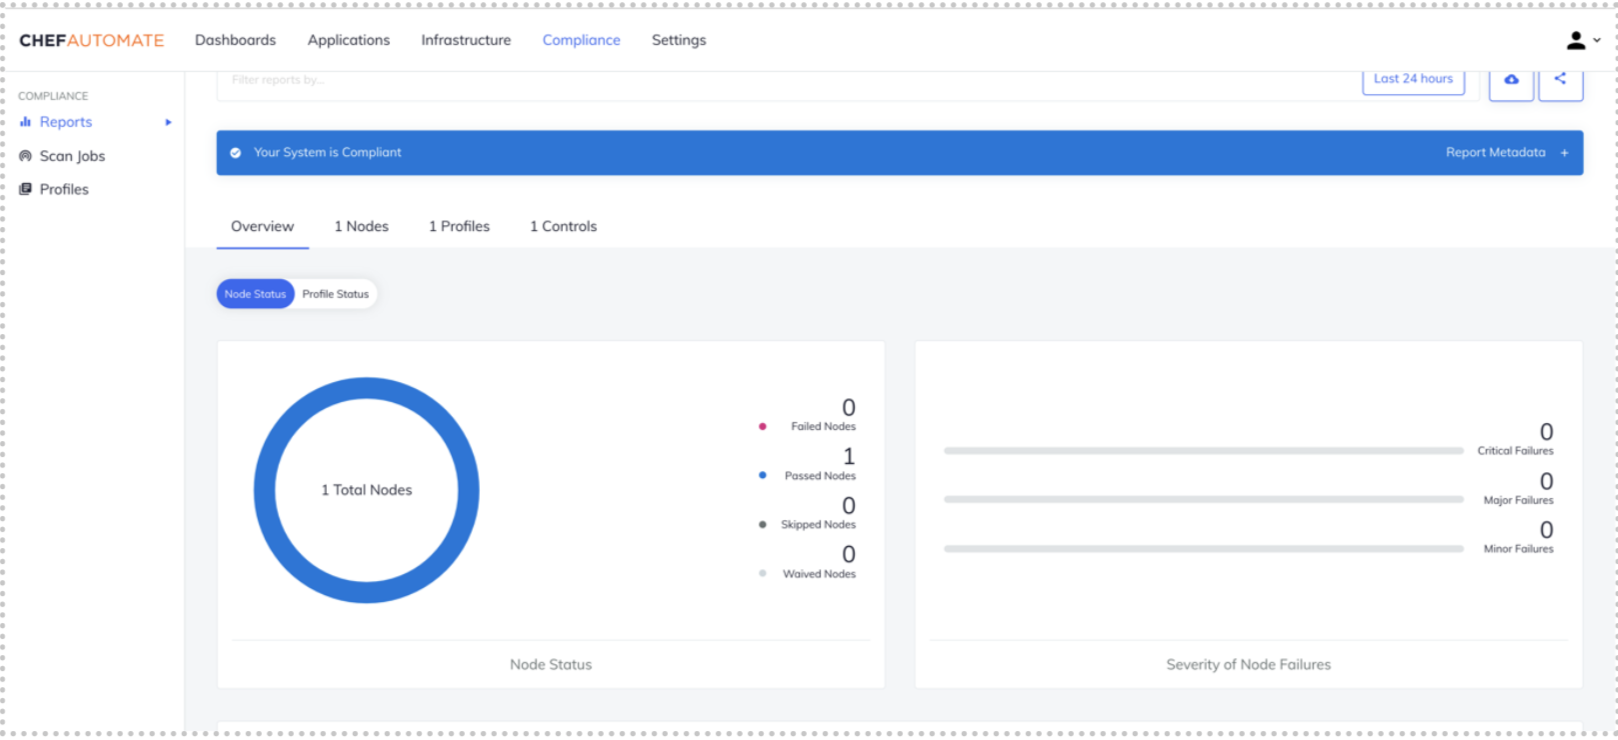
Once you have confirmed that the issue is resolved, you can create notes and close the incident. You can now understand the correlation between an issue inside the environment and a trackable incident in Service Now. End users can assign tickets
to relevant teams within the organization for quick resolution of issues. Additionally, administrators can create and run Scripts that resolve various types of tickets.
Conclusion
Integrating Chef Automate with ServiceNow can help administrators manage tickets easily and create context-specific cookbooks to resolve different issues quickly.
Benefits of using Chef Automate with ServiceNow:
- Helps manage incidents
- Helps validate the proper execution of policies
- Helps view real-time status as well as historical insights
- Better visualization Higher efficiency and productivity
If you’re an amateur getting started with DevOps or a seasoned pro looking to get some serious hands-on experience with Chef, Learn Chef is the right place for you
to be. The carefully curated tracks will guide you from the basics to the most advanced Chef techniques.

